 Pin it
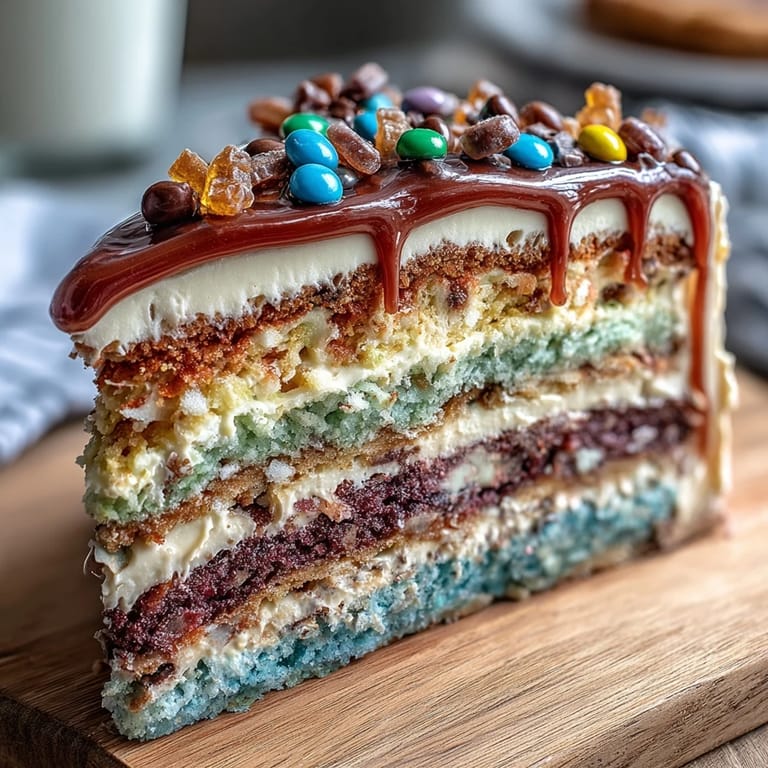
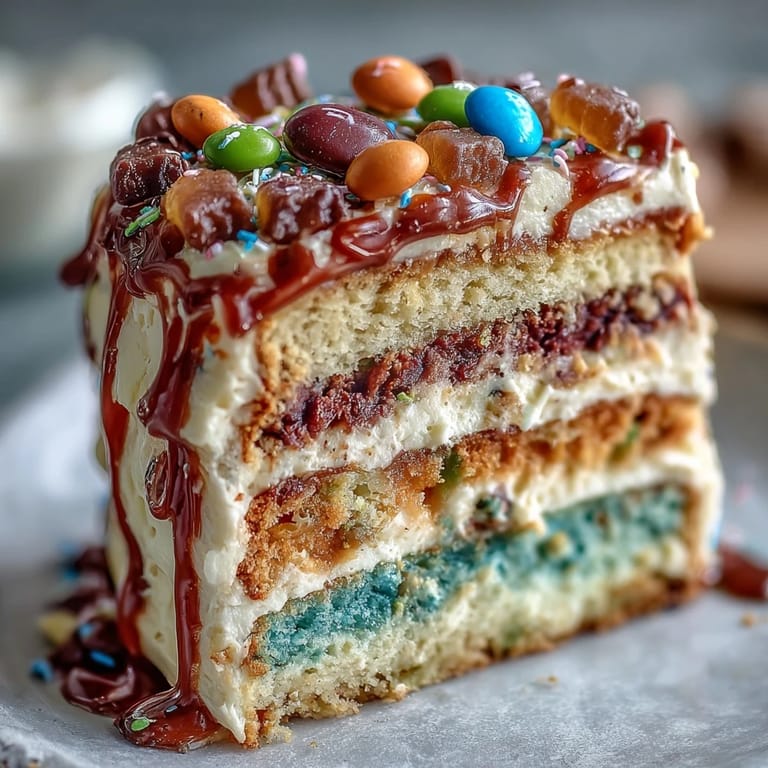
 My neighbor surprised everyone at her Cinco de Mayo party by slicing into what looked like an ordinary rainbow cake—and suddenly candy tumbled out like a real piñata. The whole room erupted, kids leaped up, and I realized right then that this cake wasn't just dessert, it was theater. I've made it three times since, each time watching people's faces light up with that same delighted shock when they see what's hiding inside.
I made this for my daughter's fifth-grade class party, and watching twenty kids huddle around as I cut into it was pure joy. One little girl literally gasped when the first candy spilled out, and her reaction alone made all those colored batters worth the extra work. That's when I understood why people take the time to do something a bit fancier—it creates a moment worth remembering.
Ingredients
- All-purpose flour (3 cups): This is your cake's foundation, and measuring it correctly makes the difference between a tender crumb and something dense.
- Baking powder and baking soda (2 ½ tsp and ½ tsp): These two work together to lift the cake and keep each colored layer light enough to stack without crumbling.
- Salt (½ tsp): Just enough to balance the sweetness and make every flavor pop, even if you can't taste it directly.
- Unsalted butter (1 cup for batter, 1 ½ cups for frosting): Use softened butter at room temperature or your mixing will be lumpy and frustrating.
- Granulated sugar (2 cups): This creams with butter to trap air, which gives the cake its tender texture.
- Eggs (4 large, room temperature): Cold eggs won't emulsify properly, so pull them from the fridge about thirty minutes before mixing.
- Vanilla extract (2 tsp for batter, 2 tsp for frosting): Real vanilla makes a subtle but real difference in how the cake tastes.
- Whole milk (1 ¼ cups for batter, ¼ cup for frosting, room temperature): Cold milk can seize the butter, so let it sit out while you prep everything else.
- Gel food coloring (red, orange, yellow, green, blue, purple): Gel is essential because liquid food coloring waters down the batter and makes the layers dense.
- Powdered sugar (5 cups, sifted): Sifting removes lumps and makes the frosting smooth instead of gritty.
- Assorted small candies (1 ½ cups): Avoid anything sticky, hard, or enormous—mini M&Ms, gummy bears, and rainbow sprinkles work beautifully.
Tired of Takeout? 🥡
Get 10 meals you can make faster than delivery arrives. Seriously.
One email. No spam. Unsubscribe anytime.
Instructions
- Set the stage:
- Preheat your oven to 350°F and grease three 8-inch round pans with a little butter and parchment paper—this prevents sticking and makes cleanup easier. Have your workspace organized because once you start coloring the batter, things move fast.
- Mix the dry ingredients:
- In a medium bowl, whisk together flour, baking powder, baking soda, and salt until evenly distributed. This aerates the flour and distributes the leavening agents so each layer rises evenly.
- Cream butter and sugar:
- Beat softened butter and sugar together for about 3 minutes until it looks pale and fluffy—this is where the cake gets its tender crumb. You'll notice the mixture becomes lighter in color and increases in volume as you beat air into it.
- Add eggs and vanilla:
- Add eggs one at a time, beating well after each addition so they fully incorporate before the next one goes in. This prevents a broken, curdled-looking batter.
- Alternate dry and wet:
- Add the dry mix in three parts, alternating with milk and starting and ending with flour—this keeps the batter emulsified and prevents overmixing. Mix just until combined; overmixing develops gluten and makes the cake tough.
- Divide and color:
- Divide the batter into six bowls and add a different gel color to each one, stirring gently until the color is even and vivid. Don't go crazy with the coloring or the batter gets watery; you just need enough to create rainbow layers.
- Bake the layers:
- Pour each colored batter into a greased pan and smooth the top, then bake for 15 to 18 minutes until a toothpick comes out clean. If you only have three pans, bake in batches and let each batch cool slightly before reusing the pans.
- Cool completely:
- Let the layers cool in the pans for 10 minutes so they set slightly, then turn them out onto wire racks to cool all the way through. Warm cake is fragile and will crack when you try to cut it.
- Cut the cavities:
- Once cool, use a 3-inch round cutter to remove the center of four layers (keep the top and bottom whole). Mark your center carefully and push straight down; if you wiggle the cutter, you'll create jagged edges.
- Make the frosting:
- Beat softened butter until creamy, then gradually add sifted powdered sugar, milk, vanilla, and a pinch of salt, beating until smooth and fluffy. If it looks grainy, you either didn't sift the sugar or you're beating too fast; slow down and be patient.
- Stack the magic:
- Place your first whole layer (purple is traditional for the bottom) on a serving plate, spread a thin frosting layer, then stack the first cut-out layer and frost lightly. Repeat with all the cut-out layers, building a rainbow tower with a hollow center.
- Fill the cavity:
- Pour your assorted candies into the hidden cavity at the top, filling it generously so there's plenty of surprise when someone cuts into it.
- Cap it off:
- Place the final whole layer on top, pressing gently so it sits flush, then frost the entire outside and top of the cake with remaining frosting. This seals everything in and keeps the cavity a secret until that magical reveal.
- Decorate and chill:
- Add any festive decorations—colored frosting swirls, sprinkles, edible glitter—then chill for at least 30 minutes before serving. Cold cake slices cleaner and the surprise stays intact.
 Pin it
 There's something magical about watching someone's expression shift from anticipation to pure joy when candy spills out of what they thought was an ordinary slice of cake. That moment is worth every bit of extra effort this recipe demands.
Rainbow Layers That Actually Stand Out
The first time I made this, I used six separate pans and baked all the layers at once, which turned out to be the smartest decision. If you only have three pans, you can absolutely bake in batches, but having them all cool at the same time means they're the same texture and temperature when you stack them. The key is making sure each layer is completely cool before assembly or the frosting will melt and your layers will slip.
The Art of the Perfect Cavity
That 3-inch cutter is the unsung hero of this cake, and using it properly makes all the difference. Mark your center by gently pressing the cutter into the cooled cake, then push straight down with confidence—hesitation creates a wobbly hole that looks sloppy when you cut into the finished cake. I learned this the hard way after my first attempt created such a crooked cavity that candies spilled out the side when I tried to serve a slice.
Storage and Make-Ahead Magic
This cake actually gets better if you make it a day ahead and let it chill overnight—the layers set completely and the whole thing becomes much easier to slice cleanly. You can bake all the layers the day before, wrap them individually in plastic wrap, and assemble everything the morning of your party. Just remember that if you're making it ahead, keep it in a cool spot or the candies inside might start to stick to the cake itself.
- Always chill for at least 30 minutes before serving to keep the surprise from spilling out prematurely.
- Use a hot, wet knife to slice through the frosting and layers—wipe it clean between cuts for neat, beautiful pieces.
- If any candies stick to the knife, your cake wasn't chilled long enough next time.
 Pin it
 This cake proves that the best desserts aren't always the most complicated—they're the ones that create a shared moment of wonder. Make this for someone you care about and watch their face light up when that first piece reveals its hidden treasure.
Recipe FAQs
- → How do I achieve vibrant cake layers?
Use gel food coloring for bright, even hues without altering the batter's consistency. Tint each portion separately for distinct colors.
- → What candies work best inside the piñata layers?
Small, non-melting candies like mini M&Ms, gummy bears, or sprinkles work well to create a fun surprise without moisture issues.
- → How can I ensure the layers bake evenly?
Use the same sized pans, grease and line them properly, and bake each layer until a toothpick comes out clean, typically 15-18 minutes.
- → What is the best way to cut the cake cleanly?
Chill the assembled cake for at least 30 minutes to firm up the frosting and filling, making slicing easier and neater.
- → Can I make this cake gluten-free?
Yes, substitute all-purpose flour with an equal measure of gluten-free flour blend to maintain texture and structure.